Wednesday, May 29, 2013

Published 12:31 PM by with 0 comment

Installing Active Directory Domain Services (AD-DS)


Method 1 – Server Manager/Initial Configuration Tasks

Roles can and should be added from Server Manager (but they can also be initiated from the Initial Configuration Tasks wizard that auto-opens the first time you log on to the server).
    1. Open Server Manager by clicking the icon in the Quick Launch toolbar, or from the Administrative Tools folder.
    2. Wait till it finishes loading, then click on Roles > Add Roles link.
    1. In the Before you begin window, click Next.
    1. In the Select Server Roles window, click to select Active Directory Domain Services, and then click Next.
    1. In the Active Directory Domain Services window read the provided information if you want to, and then click Next.
    1. In the Confirm Installation Selections, read the provided information if you want to, and then click Next.
    1. Wait till the process completes.
    1. When it ends, click Close.
    1. Going back to Server Manager, click on the Active Directory Domain Services link, and note that there's no information linked to it, because the DCPROMO command has not been run yet.
    1. Now you can click on the DCPROMO link, or read on.
      1. To run DCPROMO, enter the command in the Run command, or click on the DCPROMO link from Server Manager > Roles > Active Directory Domain Services.
      1. Depending upon the question if AD-DS was previously installed or not, the Active Directory Domain Services Installation Wizard will appear immediately or after a short while. Click Next.
      Note: The Advanced features of DCPROMO will be discussed in a future article.

      1. In the Operating System Compatibility window, read the provided information and click Next.
      1. In the Choosing Deployment Configuration window, click on "Create a new domain in a new forest" and click Next.
      1. Enter an appropriate name for the new domain. Make sure you pick the right domain name, as renaming domains is a task you will not wish to perform on a daily basis. Click Next.
      Note: Do NOT use single label domain names such as "mydomain" or similar. You MUST pick a full domain name such as "mydomain.local" or "mydomain.com" and so on.
      The wizard will perform checks to see if the domain name is not already in use on the local network.
      1. Pick the right forest function level. Windows 2000 mode is the default, and it allows the addition of Windows 2000, Windows Server 2003 and Windows Server 2008 Domain Controllers to the forest you're creating. Read my "Understanding Windows Server 2008 Active Directory Domain and Forest Functional Levels" article for more information on that.
      1. Pick the right domain function level. Windows 2000 Native mode is the default, and it allows the addition of Windows 2000, Windows Server 2003 and Windows Server 2008 Domain Controllers to the domain you're creating.
      Note: If you select "Windows Server 2008" for the forest function level, you will Not be prompted to pick a domain function level. Read more about domain and forest function levels on my "Understanding Windows Server 2008 Active Directory Domain and Forest Functional Levels" article.
      1. The wizard will perform checks to see if DNS is properly configured on the local network. In this case, no DNS server has been configured, therefore, the wizard will offer to automatically install DNS on this server.
      Note: The first DCs must also be a Global Catalog. Also, the first DCs in a forest cannot be a Read Only Domain controller.
      1. It's most likely that you'll get a warning telling you that the server has one or more dynamic IP Addresses. Running IPCONFIG /all will show that this is not the case, because as you can clearly see, I have given the server a static IP Address. So, where did this come from? The answer is IPv6. I did not manually configure the IPv6 Address, hence the warning. In a network where IPv6 is not used, you can safely ignore this warning.
      1. You'll probably get a warning about DNS delegation. Since no DNS has been configured yet, you can ignore the message and click Yes.
      1. Next, change the paths for the AD database, log files and SYSVOL folder. For large deployments, carefully plan your DC configuration to get the maximum performance. When satisfied, click Next.
      1. Enter the password for the Active Directory Recovery Mode. This password must be kept confidential, and because it stays constant while regular domain user passwords expire (based upon the password policy configured for the domain, the default is 42 days), it does not. This password should be complex and at least 7 characters long. I strongly suggest that you do NOT use the regular administrator's password, and that you write it down and securely store it. Click Next.
      1. In the Summary window review your selections, and if required, save them to an unattend answer file. When satisfied, click Next.
      1. The wizard will begin creating the Active Directory domain, and when finished, you will need to press Finish and reboot your computer.
      Note: You can automate the rebooting process by checking the Reboot on Completion checkbox.
      To automate domain controller installations, you can use an answer file or you can specify unattended installation parameters at the command line. More on that in my "Creating an Unattend Installation File for DCPROMO in Windows Server 2008" article.
      Note: As written in my "Installing Active Directory on Windows 2008 Server Core" article, configuring a Windows Server 2008 Server Core machine REQUIRES you to perform an automated installation of Active Directory on that server, as there is NOT DCPROMO GUI on Server Core.
      Your server now acts as a Domain Controller. Make sure you properly back it up. You can test functionality by using AD management tools such as Active Directory Users and Computers, examine the Event Logs, services and folders and shares that have been created.

      Links

Method 2 – Servermanagercmd.exe

Servermanagercmd.exe is the command prompt equivalent of the Add Roles and Add Features wizards in Server Manager. Through the use of various command line options, you can quickly and easily add or remove features and roles to or from your server, including the AD-DS role.
To install AD-DS by using Servermanagercmd.exe, simply enter the following command in the Command Prompt window:
Servermanagercmd.exe –I ADDS-Domain-Controller
Let the command run and when it finishes, AD-DS will be installed on the server.

Method 3 – Letting DCPROMO do the job

Oh yes. If you forget to install AD-DS or simply want to skip clicking on some windows, you can run DCPROMO from the Run command and before it is executed, the server will check to see if the AD-DS binaries are installed. Since they are not, they will auto-install.
After you complete the Add Roles Wizard, either click the link to start the Active Directory Domain Services Installation Wizard, or close Server Manager and manually run DCPROMO from the Run command.

Running DCPROMO

After installing the AD-DS role, we need to run DCPROMO to perform the actual Active Directory database and function installation.
Note: This guide assumes this is the first Domain controller in the forest, thus creating a new domain in a new forest. For a guide on how to add additional Domain Controllers to existing domains, please read my upcoming "Installing Additional Windows Server 2008 Domain Controllers in your Existing Active Directory Domain" article.
Read More
    email this       edit
Published 12:06 PM by with 0 comment

Create and map shared folder in VirtualBox


VirtualBox is a great virtualization software from Sun Microsystems. I’ve previously written many articles on how to create a virtual machine in VirtualBox and how to install Windows 7 using VirtualBox.
If you’ve had any experience with virtualization software, you’ve probably also heard of VMWare and Virtual PC. I’ve previously used Virtual PC from Microsoft for all my needs and one feature that I really liked was the ability to easily share files and folders between the guest and host operating system.
In Virtual PC, all you had to do in order to share files from the host OS to the guest OS was drag and drop onto the desktop. Super easy. When I switched over to VirtualBox, I realized that sharing folders in VirtualBox is not as simple as dragging and dropping.
virtualbox share folders
This was really annoying to me at first and it took me a little while to figure out exactly how to do it! In this article, I will walk you through the steps for sharing folders between guest and host OS in VirtualBox.
First, you have to install VirtualBox Guest Additions in the guest OS. You can do this by going to Devices and clicking onInstall Guest Editions.
share folders between guest and host
Once installed and your guest OS rebooted, you need to create a virtual shared folder. You can do this by going to Devicesagain and clicking on Shared Folders.
shared folders
Now click on the Add New Shared Folder button on the right.
share files virtualbox
In the Folder Path box, click the down arrow and then click Other. Browse to the folder on the host OS that you would like to share with the guest OS. In the Folder Name box, give your share a name. You can choose to make it read-only and to make the shared folder permanent.
add a shared folder
Click OK and the new shared folder will show up under Machine Folders if you chose to make it Permanent, otherwise it will show under Transient Folders.
share folders virtualbox
Now click OK to close the Shared Folders dialog. You have to do one more thing in order to be able to actually access the folder on the host OS. Depending on whether the Guest OS is running Windows or Linux (Ubuntu, etc), the method is different.

Windows Guest

In this case, you can either browse to the shared folder by going to My Network Places – Entire Network – VirtualBox Shared Folders or you can map a drive letter to that shared folder. I prefer the second method to make it easily accessible.
net use x: \\vboxsvr\sharename
To do this, open an command prompt and type in the above command. Simply replace sharename with the Folder Name you used when adding a share. Note that you do NOT need to change vboxsvr.
Linux Guest

To mount a shared folder in a Linux Guest OS such as Ubuntu, type in the following command:
mount -t vboxsf [-o OPTIONS] sharename mountpoint
Replace sharename with the name of the share and mountpoint with the path where you want the share to be mounted (i.e. /mnt/share).
That’s it! You should get a message like “The command completed successfully” like shown below:
virtualbox shared folders
Now when you go to Explorer or My Computer, you’ll see the new drive mounted and ready for access!
mapped network drive
Not too hard eh? Of course, if you didn’t know you had to do all this, it could get quite frustrating! Now when you need to share files or folders in VirtualBox, you’ll be able to do it easily. Enjoy!
Read More
    email this       edit
Published 10:41 AM by with 0 comment

Creating a Virtual Machine using VirtualBox


 Creating a Virtual Machine ( For Guest OS)

Open Application -> System Tools -> VirtualBox ( Command name is “virtualbox” )
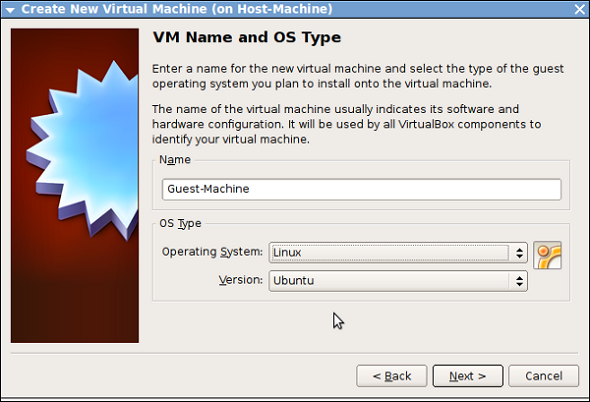
Click Machine -> New. This will launch a “Create New Virtual Machine” wizard. Click Next.
Enter the name of the Guest machine as you desire and choose the Operating system and Version that you are planning to install as follows, and click “Next”.
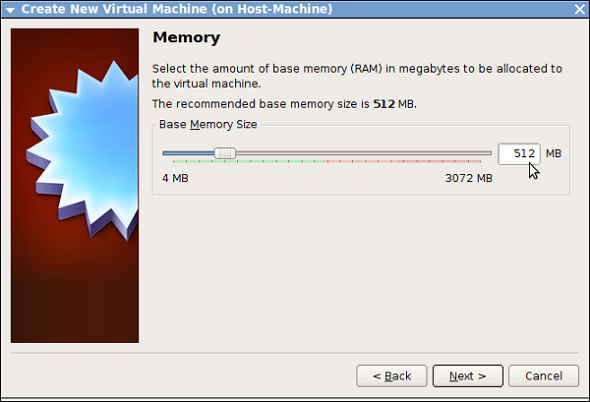
Enter the RAM size that you want to provide to your Guest machine as follows.
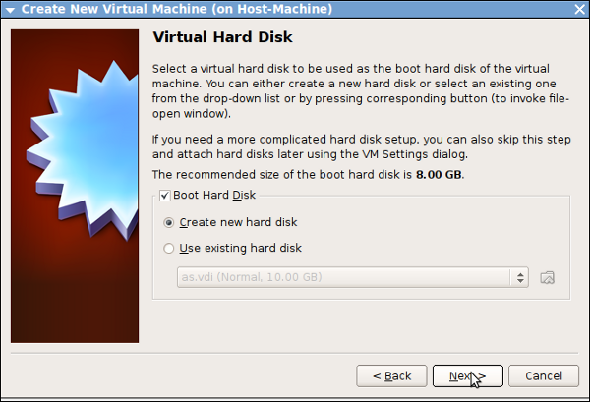
Now it will ask you to choose your “Virtual Hard Disk” for installing the guest OS as follows.
Since this is the first time we are installing, click “Create New Hard disk”.
Create “New Virtual Disk” wizard will open. Click Next
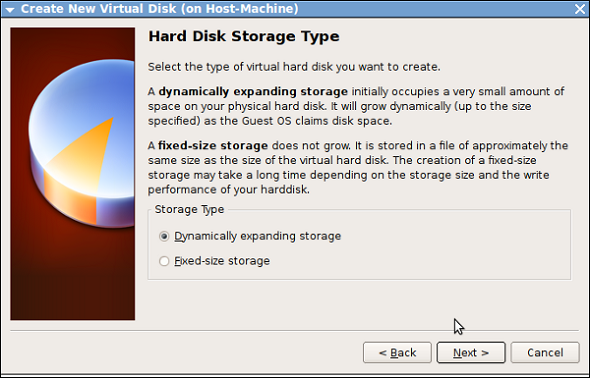
Now we need to choose, whether the disk has to be “Dynamically expanding disk” or “Fixed-size storage”.
Remember, for a guest machine, it sees a file residing in the host machine as the “Hard Disk”. Whenever a guest machine does any write to disk, it will be written into the file which resides on the host machine
If we select “Fixed storage” and if we choose the size as 10GB then, in host machine ( by default under .VirtualBox/Guest-Machine/Guest-Machine.vdi ) a file will be created with 10GB of size
If we select “Dynamic storage” then, .VirtualBox/Guest-Machine/Guest-Machine.vdi will initially be a small size file, but it will grow whenever the guest machine writes data to the disk.
Choose “Dynamic storage” and click Next.
Enter the maximum size that you want to allocate for the guest machine.
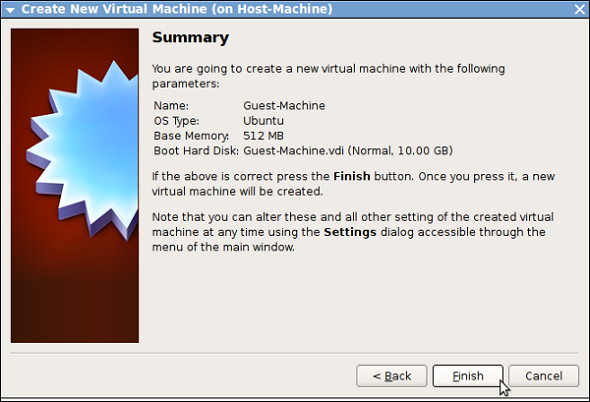
Click Finish. Now a file named “Guest-Machine.vdi” will be created under “.VirtualBox/Guest-Machine/”
Click “Finish” to complete the creation of Virtual Machine.
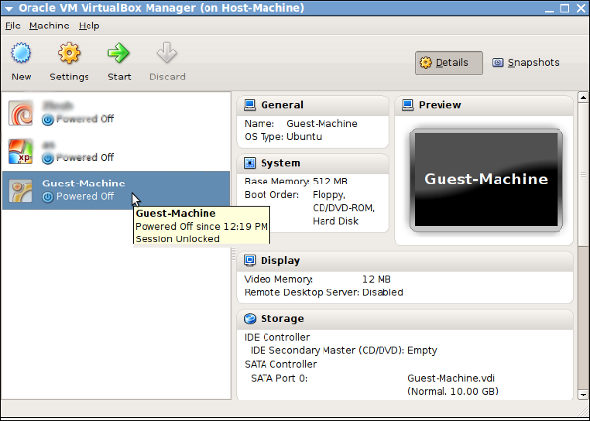
Now a new “Virtual Machine” is created and it will be in “power off” state.

3. Installing OS in a Virtual machine

We can install any OS ( personally tested windows and linux ) on a virtual machine. We can install the OS in virtual machine by 2 methods
  • Through OS-DVD
  • Through ISO image of the OS
Here we will cover the installation using an ISO image, although using DVD is very similar to this.
Make sure that the iso file of your distribution is present in the host machine.
Launch “virtualbox”. Select the newly created virtual machine. Click “Settings”.
Now a new window will open which will list out the settings group on left panel and actual setting on the right side as follows.
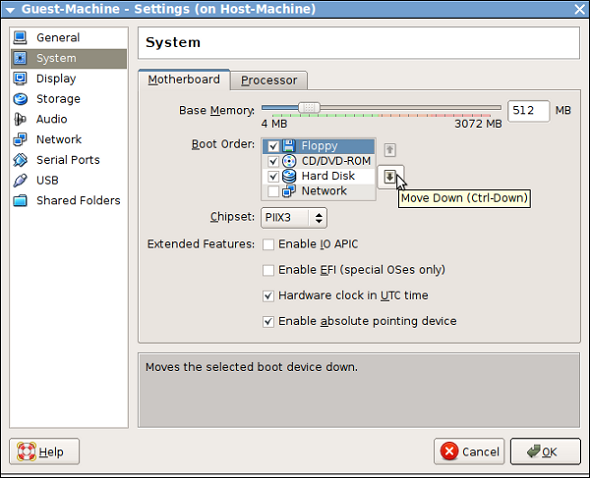
Select “System”. On the right panel ensure that the boot order is correct ( Similar to setting the boot order in BIOS ).
Use the “Move Up” or “Move Down” button button to change the boot order, and make sure CD/DVD is selected as the “First boot device” and click “Ok”.
The next step is to map the “ISO file” of your distribution to the virtual CD/DVD device.
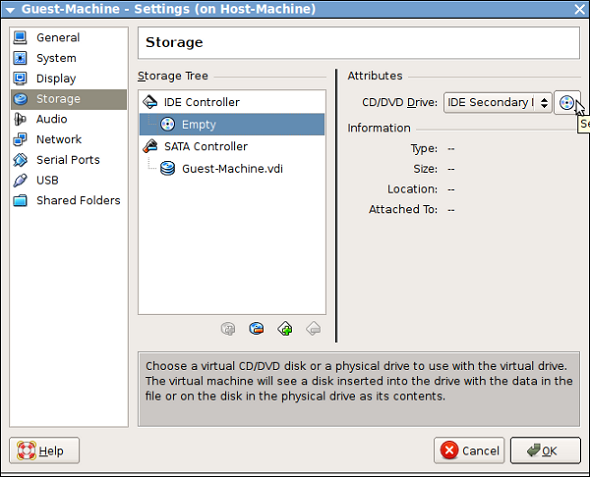
Under “Settings” go to “Storage”, the following screen will appear.
Click the “CD icon” and choose the “iso file of the OS”, here I used “Debian-Lenny”.
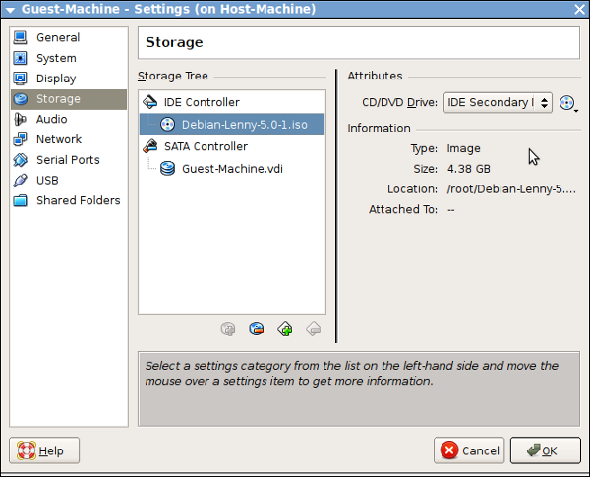
The following screen will appear once you have choosen the ISO file. Click “Ok”.
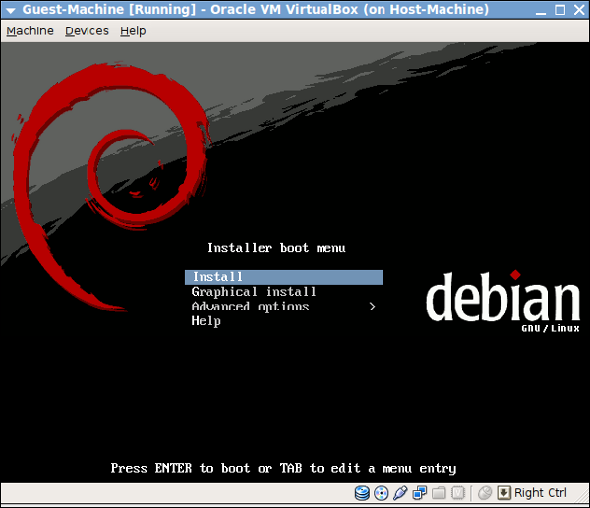
Now select the virtual machine, and click “Start”. It will start to boot from the CD/DVD which is mapped to the ISO file.
The OS installation is similar to installing an OS in a physical machine.
Once OS is installed successfully, change the “Boot Order” to boot from HDD, and click “Start”.
Now you can start using the virtual machine as like other machines.
Read More
    email this       edit

Monday, May 20, 2013

Published 2:17 AM by with 0 comment

Unable to fetch all items of an order in Magento?

I used this in my module. it may help you.

Load Magneto Order and Product Collection

$resource_model = Mage::getResourceModel('sales/order_collection');
$product_model = Mage::getModel('catalog/product');

Loop through order collection

$records = 0;
    $productData = array();
    $orderProductArr = array();

    foreach($resource_model as $all_orders)
    { 
        if($all_orders['status']!="canceled" && $all_orders['status']!="fraud")
        {  
            $i = 0;
            $items = $all_orders->getAllVisibleItems();

            foreach($items as $item)
            {
                $_product = $product_model->load($item->getProductId()); // getting product details here to get description

                $taxClassId = $_product->getData("tax_class_id");
                $taxClass = $_product->getData("tax_class_name");

                $taxRate = $order['tax_amount'];

                $orderProductArr[$i]['web_id'] = $item->getProductId();
                $orderProductArr[$i]['quantity'] = $item->getQtyToInvoice();
                $orderProductArr[$i]['price'] = $item->getPrice();
                $orderProductArr[$i]['description'] = $_product->getDescription();
                $orderProductArr[$i]['currency'] = $order['order_currency_code'];
                $orderProductArr[$i]['tax_id'] = $taxClassId;
                $orderProductArr[$i]['tax_amt'] = $taxRate;
                $orderProductArr[$i]['total_amt'] = ($item->getPrice()*$item->getQtyToInvoice())+($taxRate);

                $productData[$i]['title'] = $item->getName();
                $productData[$i]['web_product_id'] = $item->getProductId();
                $productData[$i]['price'] = $item->getPrice();
                $productData[$i]['product_sku'] = $item->getSku();
                $productData[$i]['tax_class'] = $taxClassId;
                $productData[$i]['description'] = $_product->getDescription();

                $tax_arr[$i]['tax_id'] = $taxClassId;
                $tax_arr[$i]['tax_class'] = $taxClassId;
                $tax_arr[$i]['tax_amt'] = $taxRate;

                $i++;
                unset($items);
            }   
            $data[$records]['order_data']['product_details'] = $orderProductArr;
            $data[$records]['order_data']['order_product_details'] = $productData;
            $data[$records]['order_data']['tax_arr'] = $tax_arr;
            unset($orderProductArr);
            unset($productData);
            unset($tax_arr);
            $records++;
        }   
    }
Read More
    email this       edit

Tuesday, May 14, 2013

Published 9:21 PM by with 0 comment

I changed the {{base url}} in the config and I can not revert it back


I have faced a problem changing {{base url}} through the magento admin portal and I can’t change it back. I can’t connect to admin area either. 

I found a solution and it can be change in DB. 


UPDATE core_config_data
SET value = '
correct URL here'
WHERE config_id = 7


Read More
    email this       edit

Monday, May 13, 2013

Published 9:47 PM by with 0 comment

Magento: The requested URL /Index/index.php was not found on this server.


Magento: The requested URL /Index/index.php was not found on this server.


Solution is modifying the .htaccess file.
------
Order deny,allow
Deny from all

RewriteEngine on
RewriteRule !\.(js|ico|gif|jpg|png|css|php)$ index.php
php_flag magic_quotes_gpc off
php_flag register_globals off
Read More
    email this       edit